Today we are going to learn about the AWS CDK, which is a super useful tool for you to create your infrastructure in the AWS cloud.
With CDK, you can quickly create infrastructure via code and using languages that we already use in our daily lives, such as TypeScript, Python, Java. So, to reduce the complexity of managing your infrastructure and everything in an automated way, CDK may be the ideal option for you.
IaC
Before we talk about CDK it is important to understand what is infrastructure as code
Infrastructure as code (IaC) is a way to create and manage infrastructure resources using code instead of configuring everything via a web page or by commands in a terminal.
Let’s say you need to create a web server in the cloud. Instead of going to the AWS console and clicking a bunch of buttons to manually create your server, you can write code that details all the server configurations, such as the instance type, disk size, how much memory this server will have, and network settings.
You can then run this code to automatically create and configure the server on AWS. This is useful because you can repeat the process as many times as you want, without worrying about forgetting an important configuration, and you can also manage these resources as if they were a code, save in your git repository, have all the changes history and of course, do code reviews in your infrastructure code.
Infrastructure by code may sound complicated, but it’s not. Nowadays, nobody configures applications manually, the risks of doing this in real applications is to high. That’s why infrastructure as code tools (like CDK) are so important. And by the way, way more fun than clicking in buttons right?!
CDK & Cloud Formation
There are several infrastructure as code tools on the market. Here, more in the context of AWS, let’s talk about CDK and CloudFormation. Both are tools that help developers build and manage infra resources in the cloud. The CDK was made on top of the CloudFormation add-on, and I’ll explain why.
CloudFormation is older and uses JSON or YAML files to describe the infrastructure you want to build. You need to know how to write these files in the correct syntax, and sometimes it can be a bit messy and the files can get quite large. With CloudFormation, you describe precisely what your infrastructure will look like.
AWS CDK is a little different as it allows you to use programming languages like TypeScript, Python, Java to describe your infrastructure. You can create complex and sophisticated infrastructure using classes and objects, which makes the infrastructure code more familiar to developers.
Also, with CDK, you can reuse and share code to save time. It is possible to create components and share them in your company, creating libraries, for example, that have standard configurations that can be used by several teams in your company. And of course there are open source components made by the community.
And why did I say CDK is a CloudFormation add-on? Because when we compile this CDK code, what will be generated is a CloudFormation file, which will be used to create our infrastructure.
So is CDK the best option every time? NO! One thing you always need to keep in mind is that the CDK is an opinionated solution. What do I mean by that? The CDK is a tool built on top of CloudFormation, and because of that there are several behaviours by default in this tool, which generally makes the CDK code smaller compared to Cloud Formation, and that does not mean that these behaviours do not change with new versions. CloudFormation can be very verbose and a bit trickier to work with, but on the other hand, with cloud formation you describe precisely what your infrastructure should look like.
So, with that in mind, it may be that for some more sensitive areas of your infrastructure, CDK is not the best option. OK? I hope the difference is clear.
Application
Before we get into the code, you need to have the CDK CLI installed. I’ll leave the link in the description, where you can follow the step by step.
Let’s take a quick look at the implementation of the application and then let’s start building the infrastructure together.
Our application is simple and has two endpoints:
- A POST type endpoint to record transactions.
- Where we pass a payload with email, value, currency, etc.
- A GET endpoint to list all transactions made on the day
- where we gonna have the data that we recorded, plus the date on which the transaction was made and an ID
The two endpoints will be executed via lambdas together with API Gateway and the data saved in a DynamoDB database.
The link to the code on Github is also in the description.
I won’t go into details about the implementation of the application, because it’s not the focus of this video. It’s just 2 lambdas, one saving data in our DynamoDB database and other fetching it. If you want to know more about Lambdas and DynamoDB, leave a comment and I’ll make other videos about it.
And also subscribe to the channel and leave a like to help the channel grow and I can make more videos.
Project and dependencies
If we look in the documentation we will see that it is possible to create a project using the cdk init command. This project was created using this command and I added a few other dependencies:
@aws-cdk/aws-lambda-nodejs
@types/aws-lambda
aws-sdk
- @aws-cdk/aws-lambda-nodejs and @types/aws-lambda
- to easly configure our lambdas with NodeJS
- aws-sdk
- for us to use DynamoDB
Stacks
The entry point for a CDK code to start building our infrastructure is the bin folder.
Inside that folder, we will have a file that will be created along with the project, and it is this file that will start to assemble our infrastructure.
#!/usr/bin/env node
import 'source-map-support/register';
import * as cdk from 'aws-cdk-lib';
import { InitWithCDKTypescriptStack } from '../lib/init-with-cdk-typescript-stack';

const app = new cdk.App();
new InitWithCDKTypescriptStack(app, 'InitWithCdkTypescriptStack');
We can see that the first line is the creation of a new CDK application and then we create a new stack and give it an id.
In CDK, a “stack” is basically a collection of components that you can create. It’s a set of components that you can stack and arrange in a way that makes sense to you. Of course, you can have just one stack, or you can have several and organize them any way you like.
For example, let’s say you want to build a web application on AWS. You can create a single stack that will have your EC2 instance to host the application, security settings, an S3 bucket to store files, and so on.
Or another example would be splitting by stacks that contains services that host data and others that don’t. So, s3 and DynamoDB on one stack, lambdas and API Gateway on another.
To create a stack, we need a class that extends cdk.stack and inside that class we can start listing the components that will belong to that stack.
Good to mention that stacks and the components we are going to create are in the lib folder. The bin folder is only used to signal to the CDK where the infra declaration begins.
DynamoDB Stack
Let’s first create our DynamoDB database. Inside a new file, let’s create a TransactionsTable class and extend it from Table.
import { AttributeType, Table } from "aws-cdk-lib/aws-dynamodb";
import { Construct } from "constructs";

export class TransactionsTable extends Table {
  constructor(scope: Construct) {
    super(scope, 'TRANSACTIONS_TABLE', {
      partitionKey: { name: 'EMAIL', type: AttributeType.STRING },
      sortKey: { name: 'CREATEDAT', type: AttributeType.STRING },
    });
  }
}
The class has a constructor that receives a parameter called scope, of type Construct. This parameter represents the scope in which the table is being created. In our case, this scope will be our main stack, InitWithCDKTypescriptStack.
Inside the Table class constructor, we need to insert some important information. First, we give the table a name, which is 'TRANSACTIONS_TABLE'.
A quick tip on that: when we call the database in our code and we want to use the table that we are creating, it is not possible to call the table using only this name. Resource names in AWS are required to be unique, so the table will be created with the name we gave and AWS will append some identifier to make it unique. In order to be able to use this table, in the application code we can see that we get the real name of the table via an environment variable. Then we just use this variable as TableName.
Returning to the infra code, we next specify the partitionKey and sortKey for the table. The partitionKey can be used to uniquely identify each item in the table. This is not our case, as our partition key is the 'EMAIL' field and, of course, we can have more than one transaction with the same email.
We are using the 'CREATEDAT' field as the sort key. The sortKey is always the date and time this transaction was created and we gonna use in our GET API to filter the transactions to only those made today.
The trick here is that the combination of these two keys is what really makes this transaction unique. This combination is called Composite Key.
Lambdas
Moving on to our lambdas code. Now let’s create our 2 lambdas. Let’s start with our POST lambda. Here again we are going to create a class and this time we are going to extend it from NodeJSFunction.
import { NodejsFunction } from "aws-cdk-lib/aws-lambda-nodejs";
import { Construct } from "constructs";
import { Runtime } from "aws-cdk-lib/aws-lambda";
import { Table } from "aws-cdk-lib/aws-dynamodb";

interface PostNewTransactionLambdaParams {
    transactionsTable: Table
}

export class PostNewTransactionLambda extends NodejsFunction {
    constructor(scope: Construct, params: PostNewTransactionLambdaParams) {
        super(scope, 'NewTransactionLambda', {
            runtime: Runtime.NODEJS_18_X,
            memorySize: 256,
            bundling: {
              minify: true,
              sourceMap: true,
            },
            entry: "application/src/lambda/newTransactionLambda.ts",
            handler: "handler",
            environment: {
                TRANSACTIONS_TABLE: params.transactionsTable.tableName
            }
        });

        params.transactionsTable.grantReadWriteData(this);
    }
}
In the constructor, we will again receive the scope and a new parameter, params, which is of type PostNewTransactionLambdaParams. Let’s define this interface above and use this params to receive a reference to the table we created, which we’ll use just below.
Now some settings for our lambda:
- NodeJS version: in this case, we will use the latest LTS, which is 18.
- Amount of memory this lambda will allocate: 256 MB.
- Bundling settings to compress our code and take out of the final package what is not needed.
- Now, let’s point out which lambda belongs to this configuration. So, we pass the file path there and, in
handler, the name of the input function in that file, which, in our case, is also calledhandler. - Remember I said that, to access the database, we need to get the table name via an environment variable? For this, we need to define which environment variables this lambda will have. So let’s create our table name environment variable and let’s use the reference we have to our table to get the actual name of that table in AWS.
- Next, we’re also going to use that table reference to give write and read permissions to our lambda.
And our setup is ready. Now our GET lambda is exactly the same, we’re just going to be changing the lambda path and parameters interface. Even in a real project, you might be creating a base class that has all these default settings for all your lambdas.
import { Table } from "aws-cdk-lib/aws-dynamodb";
import { Runtime } from "aws-cdk-lib/aws-lambda";
import { NodejsFunction } from "aws-cdk-lib/aws-lambda-nodejs";
import { Construct } from "constructs";

interface TodayTransactionsLambdaParams {
    transactionsTable: Table
}

export class GetTodayTransactionsLambda extends NodejsFunction {
    constructor(scope: Construct, params: TodayTransactionsLambdaParams) {
        super(scope, 'TodayTransactionsLambda', {
            runtime: Runtime.NODEJS_18_X,
            memorySize: 256,
            bundling: {
              minify: true,
              sourceMap: true,
            },
            entry: "application/src/lambda/todayTransactionsLambda.ts",
            handler: "handler",
            environment: {
                TRANSACTIONS_TABLE: params.transactionsTable.tableName
            }
        });

        params.transactionsTable.grantReadData(this);
    }
}
API Gateway
Let’s proceed with the creation of our final component, the API Gateway.
Instead of extending a class with a specific component, as we did with the table and the lambda functions, we will use a more generic component here, known as Construct. It’s crucial to note that all the other components we’ve used are also essentially Constructs, behind the scenes.
import { NodejsFunction } from "aws-cdk-lib/aws-lambda-nodejs";
import * as apiGateway from "aws-cdk-lib/aws-apigateway";
import { Construct } from "constructs";

interface TransactionsGatewayParams {
    postNewTransactionsLambda: NodejsFunction,
    getTodayTransactionsLambda: NodejsFunction,
}

export class TransactionsGateway extends Construct {
    constructor(scope: Construct, params: TransactionsGatewayParams) {
        super(scope, 'TransactionsGateway');

        const api = new apiGateway.RestApi(this, "TransactionsApi", {
            restApiName: "New Transactions API",
            description: "Backend Horizon - New Transactions API",
          });

          api.root.addMethod("POST", new apiGateway.LambdaIntegration(params.postNewTransactionsLambda, {
            requestTemplates: { "application/json": '{ "statusCode": "200" }' },
          }));

          api.root.addMethod("GET", new apiGateway.LambdaIntegration(params.getTodayTransactionsLambda, {
            requestTemplates: { "application/json": '{ "statusCode": "200" }' },
          }));
    }
}
We will define a constructor that will take the parameters scope and params, which will contain references to our two lambda functions.
The next step involves creating a new Rest API. This newly created API will be configured with several parameters:
- We will pass our own class
TransactionsGatewayas the first parameter. - Next, we’ll assign an ID to this API, which we’ll call
TransactionsApi. - Moreover, we’ll set a name and a description for this API.
The next step is to connect our lambdas to this Rest API. We’ll add a POST method at the root of our API. The integration between our lambda function postNewTransactionsLambda and this API will be carried out through a LambdaIntegration. Additionally, we’ll specify the response format that this API will return. Among the various options available in the documentation, we’ll choose to use the application/json model, along with the status code (statusCode), which is a common practice.
Following that, we’ll repeat this process for the lambda function getTodayTransactionsLambda, but this time, setting it up as a GET method.
Main Stack
Now that all our components are created, it’s time to connect them. It will be quite straightforward.
import * as cdk from 'aws-cdk-lib';
import { Construct } from 'constructs';
import { TransactionsTable } from './dynamodb/transactions-table';
import { TransactionsGateway } from './gateway/transactions-gateway';
import { GetTodayTransactionsLambda } from './lambdas/get-today-transactions-lambda';
import { PostNewTransactionLambda } from './lambdas/post-new-transaction-lambda';

export class InitWithCDKTypescriptStack extends cdk.Stack {

  constructor(scope: Construct, id: string, props?: cdk.StackProps) {
    super(scope, id, props);

    const transactionsTable = new TransactionsTable(this);

    const postNewTransactionsLambda = new PostNewTransactionLambda(this, { transactionsTable });
    const getTodayTransactionsLambda = new GetTodayTransactionsLambda(this, { transactionsTable });

    new TransactionsGateway(this, { postNewTransactionsLambda: postNewTransactionsLambda, getTodayTransactionsLambda });
  }
}
Firstly, we take the TransactionsTable component, which we previously developed. When creating this component, we’ll pass our Stack as argument for the scope parameter.
Next, we’ll instantiate and integrate our two lambdas. Both will require the Stack and the newly created transactionsTable as parameters.
Our final step in this phase involves setting up our Gateway. Here, we’ll provide the current stack and the lambdas we previously set up as arguments.
With this, our primary Stack construction wraps up. The next step is deploying this stack and the application on AWS.
Deploy
Before deploying our application, we need to initiate the “bootstrapping” process. This is a one-time prerequisite step.
- Begin by executing the command
npm run cdk bootstrap. - Upon successful completion, proceed with the deployment using
npm run cdk deploy. An overview of the pending changes will be displayed. Please confirm these changes.
Once the deployment concludes, the terminal will display the base URL for your APIs, allowing you to test them.

Testing
With our application now deployed, it’s time for testing.
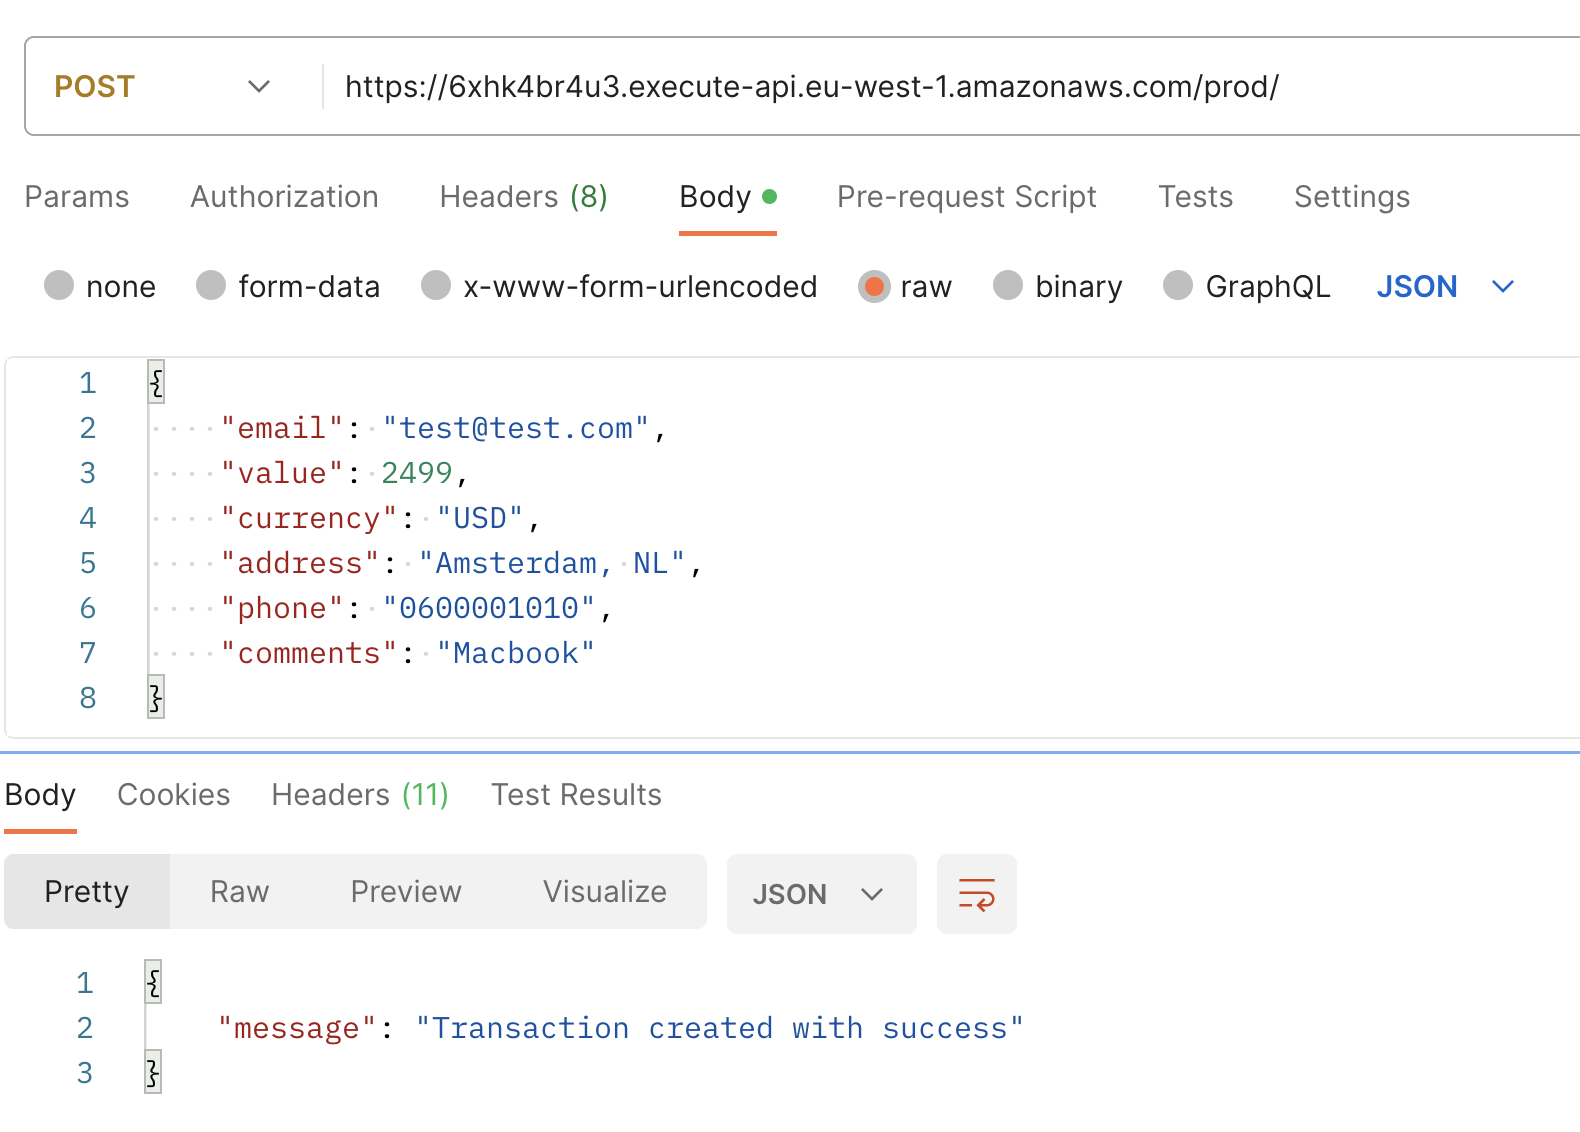
Utilize the base URL displayed in your console to make a POST request, using the following sample payload. In response, you should receive a message stating “Transaction created with success.”
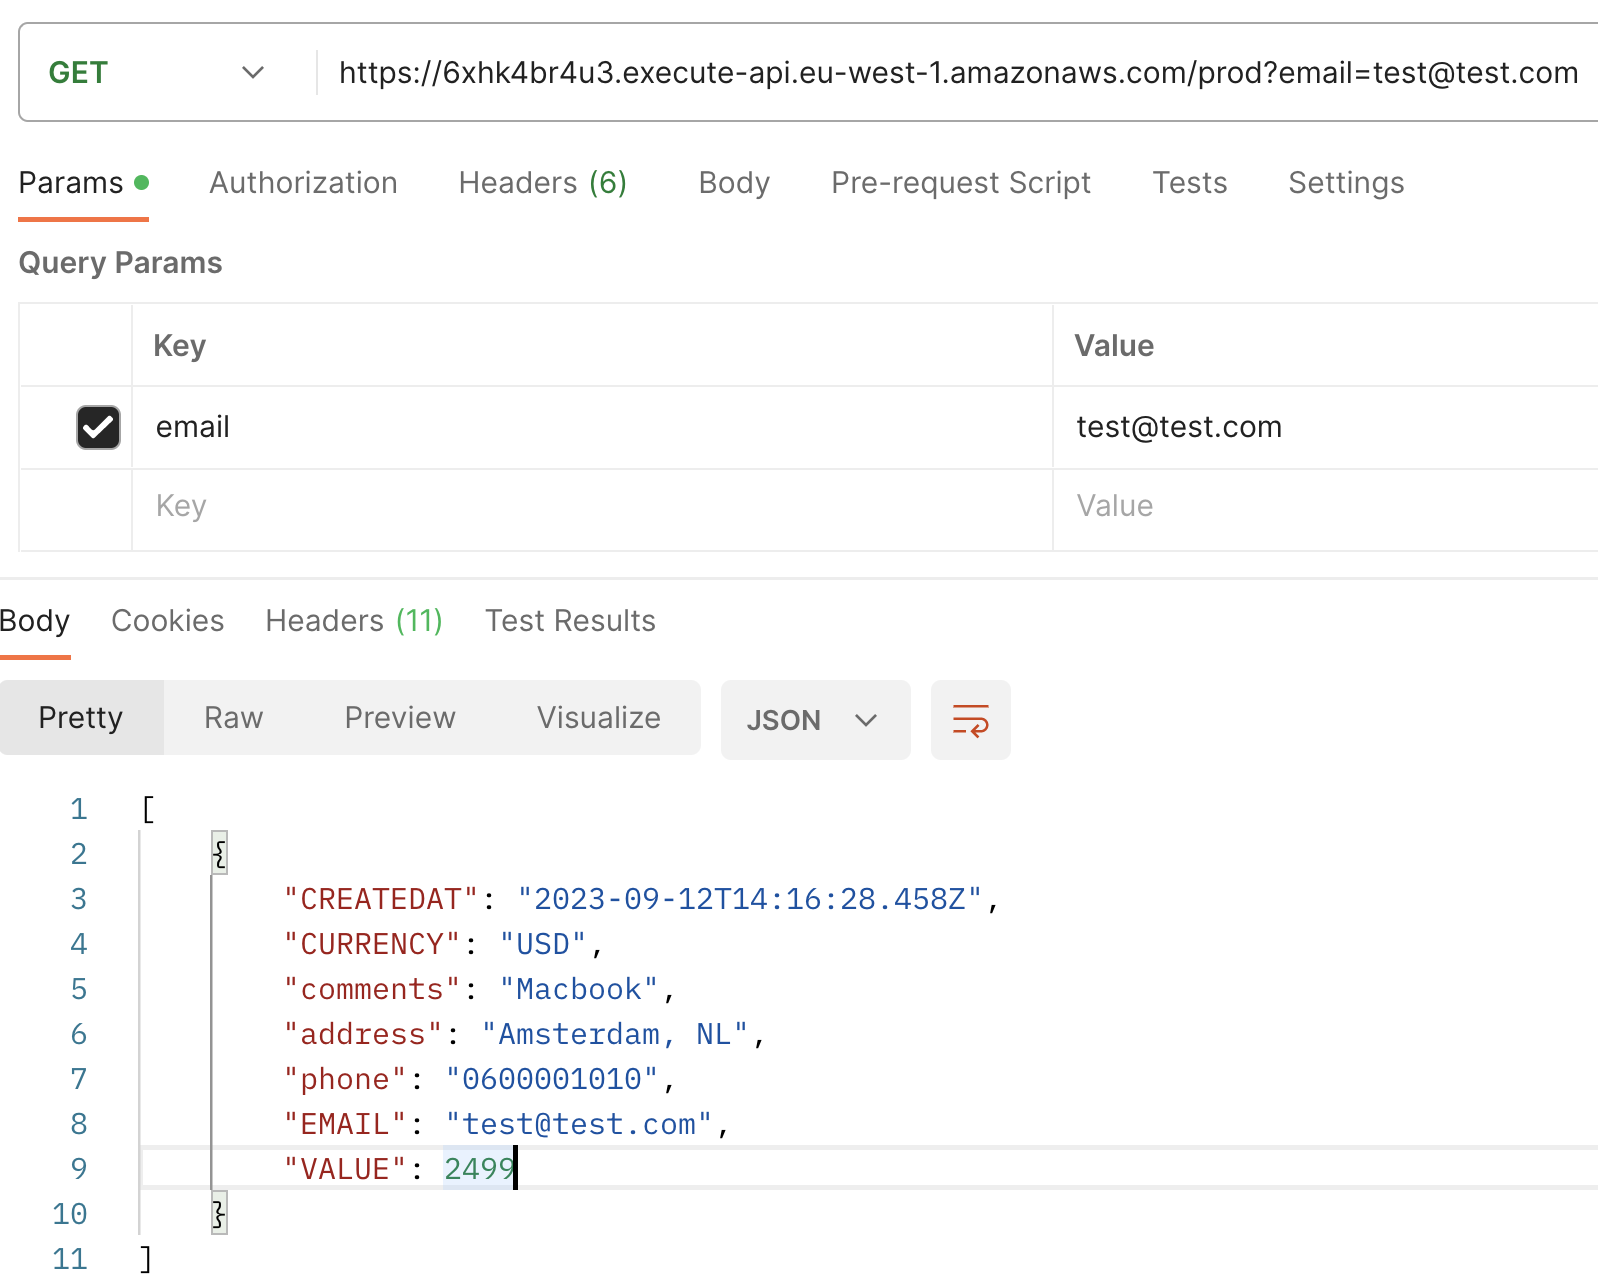
Next, when you execute a GET request with email as query parameter, you’ll observe the recently created transaction, now incremented with an additional field: CREATEDAT.
And we’re finally done. 🎉🎉🎉
You can find the full project on GitHub.
Questions or suggestions, please leave a comment, we’re all here to learn together. 🤠
Thanks for reading!