In the world of software development, having a consistent and reliable development environment is crucial for productivity and efficiency. Traditional local development environments, where you would install everything manually often face challenges related to compatibility issues, dependency and version conflicts, and the need for extensive setup and configuration. This is where Docker Dev Containers step in and it’s a game changer to your development experience.
What are Docker Dev Containers?
Imagine a box with all the tools you need to build a specific project, like a toolbox for woodworking (hammers, saws, etc.). Docker dev containers are like these boxes, but for software development. They contain all the necessary software pre-installed in a virtual environment, ready to use.
Docker dev containers are lightweight, isolated environments that utilize Docker technology to package a complete development environment within a container (your toolbox!). These containers encapsulate all the necessary tools, libraries, and runtime configurations required for developing a specific project. By running a dev container, developers gain a consistent and predictable environment that replicates the environment precisely. This ensures that code changes made locally will behave identically when deployed to the cloud or between multiple people working together.
Consistent and Reusable Environments
Dev containers help everyone on a team use the same setup for their development environment, no matter which computer they’re using. Think of it like this: instead of everyone baking a cake with slightly different ovens and ingredients, dev containers make sure everyone uses the exact same oven and the same recipe. This means that a project worked on by one person will work just the same for someone else, and when new team members join, they can start coding right away without setting up their own environment from scratch.
“Works on my machine”. Wrote by someone that doesn’t use Dev Containers
Using the Dev Containers Extension in Visual Studio Code
The Dev Containers extension in Visual Studio Code makes it super easy to work with development containers. Here’s a quick breakdown of how it’s used:
- You can set up a new dev container right within VS Code without messing with complex configurations. Just use one of the pre-built templates or define your own to get started.
- The extension allows you to seamlessly switch between different development environments. It’s like having multiple computer setups in one, without any of the usual complications that come with it.
- Interacting with your code is just like working on your local desktop. You can edit, run, and debug your projects within VS Code, using the same interface you’re already familiar with, even though the actual code is running inside a container.
Understanding devcontainer.json
The devcontainer.json file is essentially the blueprint for your dev container. It specifies everything your development environment needs to have, such as:
- Which base image to use: This is like choosing the “OS” of your development setup. It could be a simple Ubuntu environment or something more customised.
- Required software: It lists all the tools and programs that need to be pre-installed in the container. This means you don’t have to waste time setting these up manually.
- Settings and extensions: The file can also include configuration settings for VS Code and list any extensions that should be installed automatically.
This configuration file ensures that anyone who uses the dev container will have the exact same setup, regardless of their personal computer, which helps in avoiding the “it works on my machine” problem.
Let’s take a look on the devcontainer.json from my article about CDK:
{
    "name": "aws-dev-container",
    "image": "mcr.microsoft.com/devcontainers/typescript-node:1-18-bookworm",
    "features": {
        "ghcr.io/devcontainers/features/aws-cli:1": {},
        "ghcr.io/devcontainers-contrib/features/aws-cdk:2": {}
    },
    "customizations": {
        "vscode": {
            "extensions": [
                "dbaeumer.vscode-eslint",
                "eamodio.gitlens",
                "firsttris.vscode-jest-runner",
                "ryanluker.vscode-coverage-gutters",
                "humao.rest-client"
            ]
        }
    },
    "remoteUser": "root"
}
- name: This key assigns a friendly name to the development container, which helps you easily identify it among multiple containers.
- image: Specifies the Docker image to use as the base for the dev container. This determines the operating system and pre-installed languages or frameworks. In the example above, I used an image that contains NodeJS and Typescript already installed.
- features: That’s one of the best … features of dev containers. “Features” are additional tools or utilities that are automatically installed in the container. These are typically used to extend the base functionality of the container with specific capabilities. In the example, I added the AWS CLI and CDK. You can find a full list of features that you can add in your container here.
- customizations: Allows you to customize the development environment specifically for VS Code.
- extensions: Lists VS Code extensions to be automatically installed in the container, enhancing your development experience without manual setup.
- remoteUser: Specifies the default user under which the VS Code server will run inside the container. This affects permissions and access to files and processes within the container. For example,
rootmeans that you will operate as the root user, which generally has unrestricted access to modify anything within the container.
Using Dev Containers
To use dev containers, you first need to install the Dev Containers extension.
Dev Container configuration files (devcontainer.json) are located in the .devcontainer folder at the root of your project.
When you open a project with this configuration for the first time, VS Code will prompt you with a suggestion.
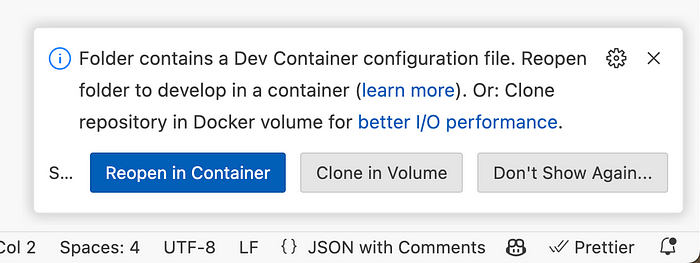
Visual Studio Code suggestion to open your project into a container.
VS Code will detect the container configuration and ask if you want to open the project inside a container. By selecting “Reopen in Container,” a Docker image and container will be created. Your screen will then reload, and VS Code will connect to your container.
It’s also possible to build/rebuild the container via “Command Palettte”.

Command Palette options to build/rebuild and open the project in a container
After your container is built, you will have an environment as described in the devcontainer.json configuration.
Basic Configuration with devcontainer.json
The devcontainer.json file is the core of the dev container configuration. As you saw above It allows you to specify various settings and features directly, making it easy to set up a development environment and very customisable with “features”.
Advanced Configuration with Dockerfile
If you have the necessity of a more customisable and modular setup, you can extend your devcontainer.json configuration by pointing to a Dockerfile. This approach allows for greater flexibility and control over the environment.
{
    "name": "aws-dev-container",
    "build": {
        "dockerfile": "Dockerfile"
    },
    "customizations": {
        "vscode": {
            "extensions": [
                "dbaeumer.vscode-eslint",
                "eamodio.gitlens",
                "firsttris.vscode-jest-runner",
                "ryanluker.vscode-coverage-gutters",
                "humao.rest-client"
            ]
        }
    },
    "remoteUser": "root"
}
Questions or suggestions, please leave a comment, we’re all here to learn together. 🤠