
In this article you will learn how to create your first API with Spring Boot and Kotlin.
Spring Framework
Spring Framework 🍃, the most popular framework in Java for application development. Millions of developers use Spring every day to create all kinds of applications. Spring’s first release in 2003 had a focus on dependency injection but the framework has grown immensely, the spring team created a set of modules that support almost everything that a developer needs to create an application. Given so much maturity, it’s no wonder that the framework is used in the top tech companies in the world. That’s the advantage of a project that has been in constant development and improvement for almost 20 years.
What’s Kotlin
Kotlin is a language made by Jetbrains, the same company that created all the amazing IDE’s like IntelliJ Idea. JetBrains was not happy with Java and the other languages in the market and decided to create Kotlin to be an improvement over Java. And when I say improvement it’s because Kotlin was designed to be completely compatible with Java, making it possible to have a shared codebase between these two languages, allowing companies to make a gradual migration from Java.
Kotlin has been becoming super popular among developers and according to the StackOverflow 2020 Survey, Kotlin is one of the most loved languages. All this love is not from nothing. Kotlin has a lot of features that make the development easier, less verbose, and higher failure-proof. One of the best functionaries is a native null safer system, extensions classes, high order functions, and the async await version of the language, called coroutines.
Creating project
To start creating our project we’ll be using the Spring Initializer tool. You can find it on start.spring.io. This is a tool created by the spring team and it’s super useful because we already can do our initial setup and include our main dependencies.
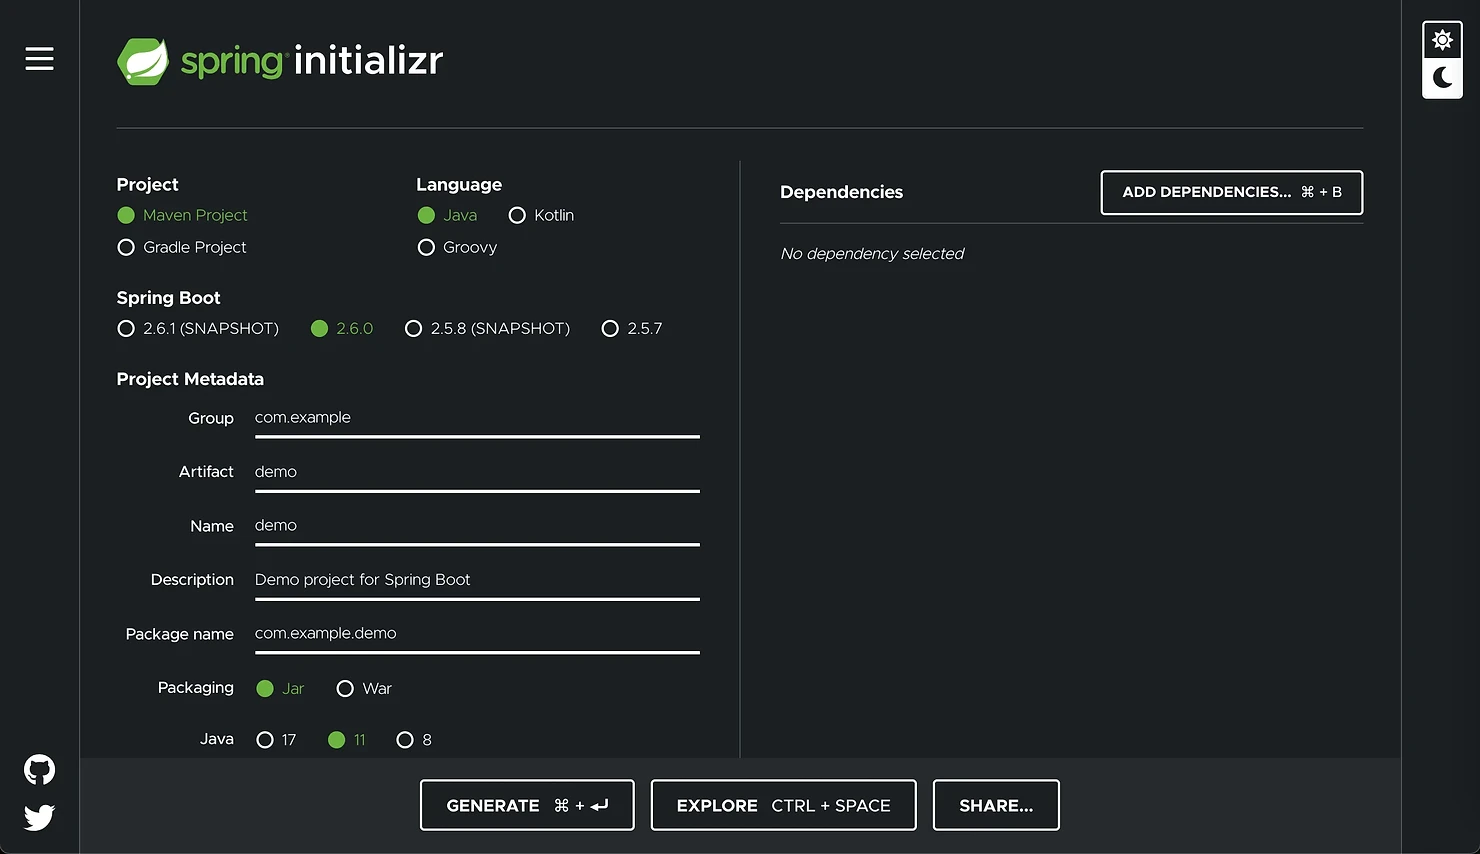
First, you can find the full source code here on my Github. For this project, we’ll use a setup a bit different from the other common tutorial that we can find with Spring Boot. We gonna use Gradle as our build tool but of course, as you can see Maven it’s also an option. We’ll choose the most stable version of Spring, that’s 2.6.0 (when I’m writing this article). You can change the project metadata if want or just leave the default values. I choose Java 11 because I still don’t have Java 17 installed but will make no difference for this project.
In the right column, we have the option to include our initial dependencies. For this project, we will include a few of them and later we will add other dependencies manually in our Gradle file. Let’s start including:
- Spring Boot DevTools — There are some nice features that can help us during development like automatic reload, live to reload, and disabling caching. Very useful during development.
- Spring Web — We’ll need to create our API’s
- Spring JPA and H2 Database — to save our data
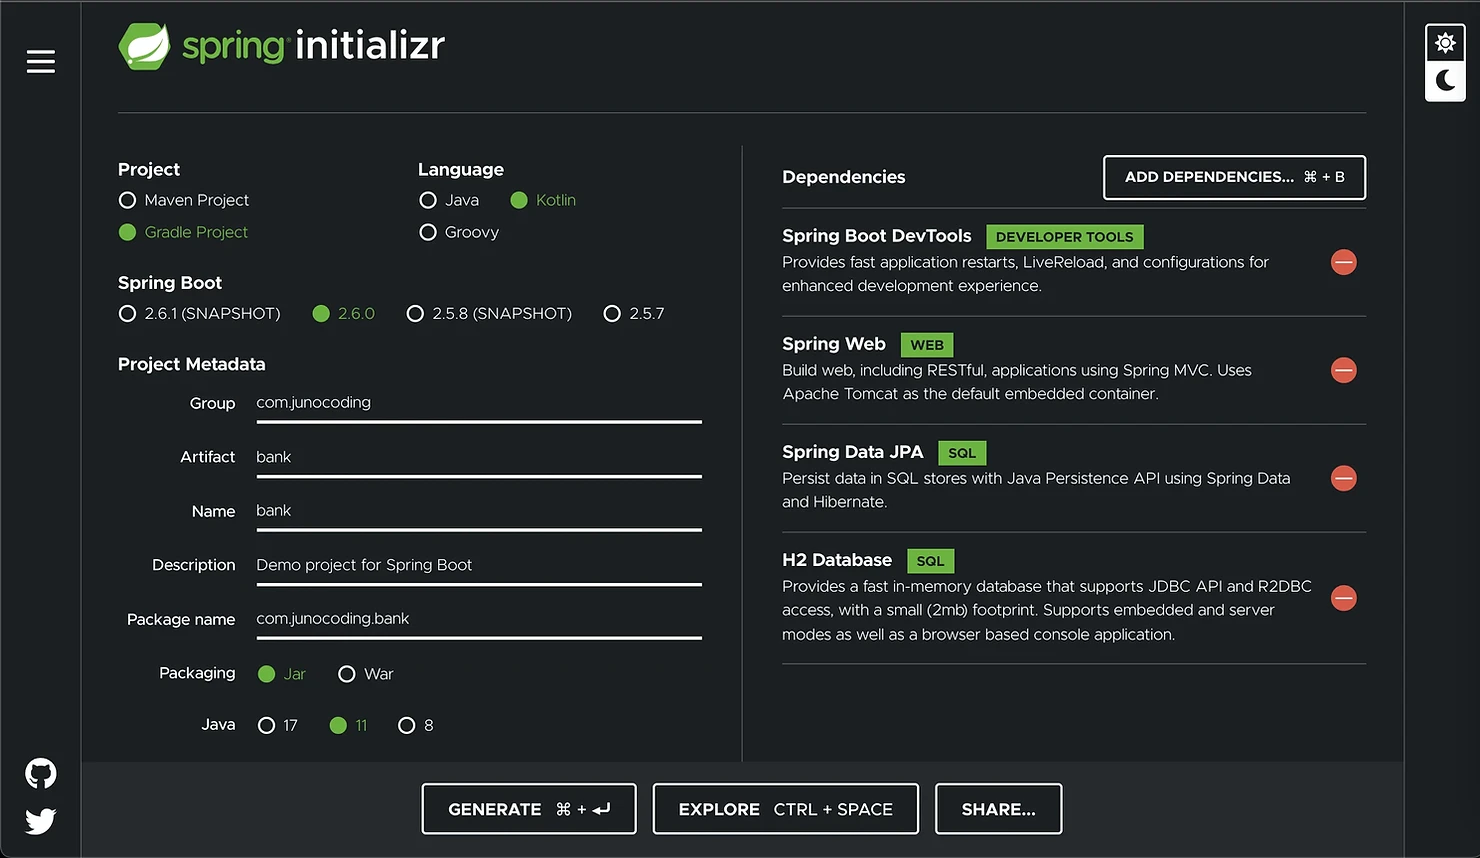
As you can see in my metadata in gonna create an example simulating a bank and we’ll make a transfer API. 💰
IntelliJ Idea
Unzip the file and open it in your IDE. I’ll be using IntelliJ Idea Community Edition. You can download it for free or use another IDE. Something nice to mention is that if you have the ultimate version of the IntelliJ Idea, the Spring Initialiser Tool that we just saw is already embedded in the IDE, so you can do all the project creation directly there.
Gradle file
The first thing we gonna take a look at is our build.gradle.kts file. You can find it in the root of the project folder. This is the file where we can manage our dependencies and since we used Spring Initializer for the initial setup we can see the tool created this file with our configuration and the selected dependencies.
import org.jetbrains.kotlin.gradle.tasks.KotlinCompile

plugins {
	id("org.springframework.boot") version "2.5.7"
	id("io.spring.dependency-management") version "1.0.11.RELEASE"
	kotlin("jvm") version "1.5.31"
	kotlin("plugin.spring") version "1.5.31"
	kotlin("plugin.jpa") version "1.5.31"
}

group = "com.backendhorizon"
version = "0.0.1-SNAPSHOT"
java.sourceCompatibility = JavaVersion.VERSION_11

repositories {
	mavenCentral()
}

dependencies {
	implementation("org.springframework.boot:spring-boot-starter-data-jpa")
	implementation("org.springframework.boot:spring-boot-starter-web")
	implementation("com.fasterxml.jackson.module:jackson-module-kotlin")
	implementation("org.jetbrains.kotlin:kotlin-reflect")
	implementation("org.jetbrains.kotlin:kotlin-stdlib-jdk8")
	developmentOnly("org.springframework.boot:spring-boot-devtools")
	runtimeOnly("com.h2database:h2")
	testImplementation("org.springframework.boot:spring-boot-starter-test")
}

tasks.withType<KotlinCompile> {
	kotlinOptions {
		freeCompilerArgs = listOf("-Xjsr305=strict")
		jvmTarget = "11"
	}
}

tasks.withType<Test> {
	useJUnitPlatform()
}
Since we choose to use Kotlin, Spring Initializer already created this configuration file as a Kotlin one. For the people that are not familiar with Gradle, I’m pointing this because it’s also possible to write your Gradle files with Groovy. Since we’re already using Kotlin I highly recommend also to use it with Gradle since there are some advantages over Groovy, like auto-completion, for example.
Gradle Plugins
Let’s take a look at the plugins block. Gradle itself doesn’t do a lot by default but it provides options to us developers to extend and add new features to our builds. A great example of this is the “plugins” block where we have plugins that configure and leave our project ready to use very easily.
We can see that we have a few plugins and most of them are to do an initial setup for Spring and Kotlin. Let’s take a look at the Spring Boot Plugin page, and see how the plugin is described:
Spring Boot makes it easy to create stand-alone, production-grade Spring based Applications that can you can “just run”. We take an opinionated view of the Spring platform and third-party libraries so you can get started with minimum fuss. Most Spring Boot applications need very little Spring configuration.
In other words, easy configuration to start working on your project immediately. All the others plugins do something similar, they prepare and help manage our project dependencies to be configured and integrated in the best way.
Below plugins, we have the metadata that we choose and the Java Version.
Maven Central is the repository from where we are downloading our dependencies and under the dependencies block, it’s listed all the libraries that we have in the project. Later we will return to this file and we gonna include some extra dependencies.
There’s another important file that is worth taking a quick look and that’s our Application file.
Application file
Let’s open our Application file. In the project on GitHub, you can find this file titled as BankApplication but this will change depending on what you choose in your metadata. Here we find the most famous function of all, the main function, where the application starts.
package com.backendhorizon.bank

import org.springframework.boot.autoconfigure.SpringBootApplication
import org.springframework.boot.runApplication

@SpringBootApplication
class BankApplication

fun main(args: Array<String>) {
	runApplication<BankApplication>(*args)
}
We can see that in the main method we have this function runApplication indicating to run with the BankApplication class and in this class, we just have a single annotation, @SpringBootApplication. This single annotation does a lot for us.
Let’s take a quick look at how the documentation describes it:
Indicates a configuration class that declares one or more
@Beanmethods and also triggers auto-configuration and component scanning. This is a convenience annotation that is equivalent to declaring@Configuration,@EnableAutoConfigurationand@ComponentScan.
In the next chapter, we’ll create our first Controller and something that you’ll notice is that we’ll not create an instance of the controller. That’s because the @SpringBootApplication annotation is composed of 3 other annotations and one of them is the @ComponentScan.
As the name already suggests, @ComponentScan will look/scan our project for components and when it finds it, Spring will create and manage this instance for us. Something nice to mention is that for a component to be auto-detected it needs to be at the same package level or below of the application class.
Components are classes annotated with special annotations that candidates these classes to be auto-detected. There’re a few different annotations that can be used for different purposes like @Component, @Controller, @RestController, @Repository and @Service.
The @EnableAutoConfiguration will do something similar for the libraries in the project. It will look in our classpath, check the libraries that we’re using and it will load an initial configuration for us. We’ll see this with our database. Keep reading. 😉
First API
Let’s create our first API controller. Create a package called controller and on it, a class called TransferController. Create 2 methods, newTransfer and getAllTransfers like the example below.
package com.backendhorizon.bank.controller

import org.springframework.web.bind.annotation.GetMapping
import org.springframework.web.bind.annotation.PostMapping
import org.springframework.web.bind.annotation.RequestMapping
import org.springframework.web.bind.annotation.RestController

@RestController
@RequestMapping("/transfer")
class TransferController {

    @PostMapping("/new")
    fun newTransfer() {
        System.out.println("Saved")
    }

    @GetMapping("/all")
    fun getAllTransfers(): String {
        return "Hello"
    }

}
Let’s understand what’s happening here. On Top of our TransferController class, we used 2 annotations, @RestController and @RequestMapping:
@RestController: Using this annotation we indicate to Spring Boot that this class is a web handler/web controller. It’ll receive requests and return responses to the callers. Since it’s a type of “controller” this component (keep in mind this term) will also be managed by Spring Boot.@RequestMapping: This indicates what’s signature this web controller will have in the request address, after the host address. For example, our 2 methods endpoints will have the following addresses:localhost:8080/transfer/newandlocahost:8080/transfer/all.
Following the methods, they’re relatively simple:
newTransferlogs a “Saved” message in the console and his annotation indicates that this will be a “Post” request,@PostMappingand like the controller it indicates what’s the signature for this method,localhost:8080/payment/new.getAllTransferreturns a “Hello” message to the caller and similar to the previous method, it indicates the type of the request, in this case, a Get request,@GetMapping, followed by the signature,localhost:8080/payment/all.GetandPostare part of the REST specification, if you’re not familiar with them leave a comment and I’ll create a new article explaining them more in-depth.
Running & Testing
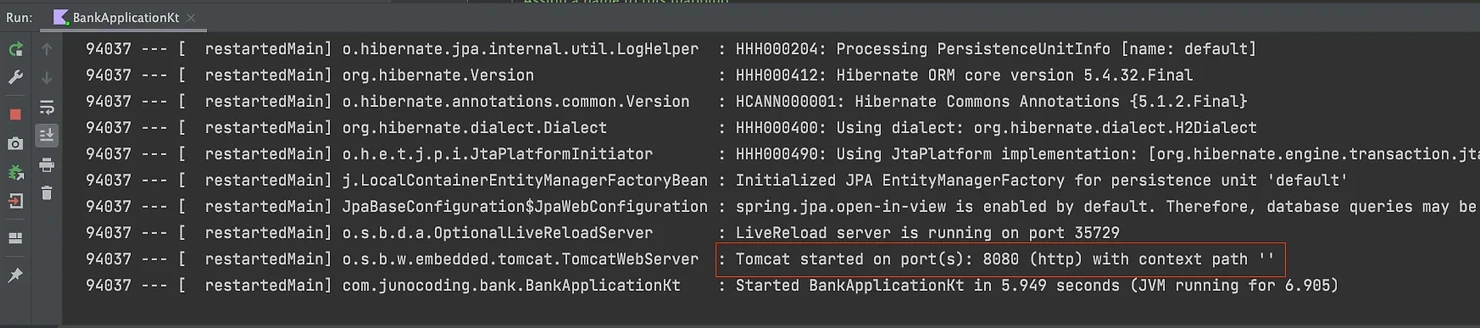
Now we have everything that we need to do our first test. Go to the main function in the application file and run your application. You should start to see some logs and Tomcat our WebServer will start and host the application without any problems. Notice in the logs that Tomcat will tell you what port your application is running.
Now we need to test these endpoints. The best way is to use a tool made for that. I personally recommend Postman. It has full support for REST APIs, making it possible to test all the different types of REST endpoints, setting up JSON bodies, headers, authorization tokens, etc. Postman also has GraphQL support in case you’re fancy. 😂
Open a new tab on Postman, select GET and type the getAllTransfers endpoint address, like the picture below:

As you can see we received a “Hello” message in return. Our API is working! Do the same for newTransfer, change the URL and the type to POST. You’ll see that the API is also working and the “Saved” message printed on the IntelliJ Idea console.
Notice that we didn’t create any instance of TransferController, just the @RestController annotation indicated to Spring that our controller needed to be created. Works like a charm, right?!
Data Models
Let’s start to prepare our application to receive and save data. Inside the controller package create a new one called model. Create two new classes, TransactionModel and OverviewTransactionModel.
Into the TransactionModel class we gonna create a few attributes. So let’s imagine that to make a transfer to another person we need to know what’s the account identifier, which can be a number or a string, depending on the country that you live in. We also need the value and a description that can be optional.
package com.backendhorizon.bank.controller.model

class TransactionModel(
    val targetAccount: String,
    val value: Double,
    val description: String = "",
)
When we fetch the list of all transactions, we’d like to see a bit more data. Besides all the previous data we’ll have two extra fields, the date of the transaction and the transaction identifier(id).
package com.backendhorizon.bank.controller.model

import java.util.*

class OverviewTransactionModel(
    val targetAccount: String,
    val value: Double,
    val description: String,
    val date: Date,
    val id: String
)
Update your TransferController like the code below with the new models that we created. You can notice that in the newTransfer method we have a new annotation @RequestBody. This indicates that the TransactionModel is part of this request and will deserialize the JSON automatically into our model.
package com.backendhorizon.bank.controller

import com.backendhorizon.bank.controller.model.OverviewTransactionModel
import com.backendhorizon.bank.controller.model.TransactionModel
import org.springframework.web.bind.annotation.*

@RestController
@RequestMapping("/transfer")
class TransferController {

    @PostMapping("/new")
    fun newTransfer(@RequestBody transactionModel: TransactionModel) {
        // TODO: SAVE THE DATA
    }

    @GetMapping("/all")
    fun getAllTransfer(): List<OverviewTransactionModel> {
        // TODO: FETCH THE DATA
        return listOf()
    }

}
Database
Now that we’re receiving data throw our API we need to store it in a database. We gonna use an in-memory database called H2 that we already included in our build.gradle.kts file.
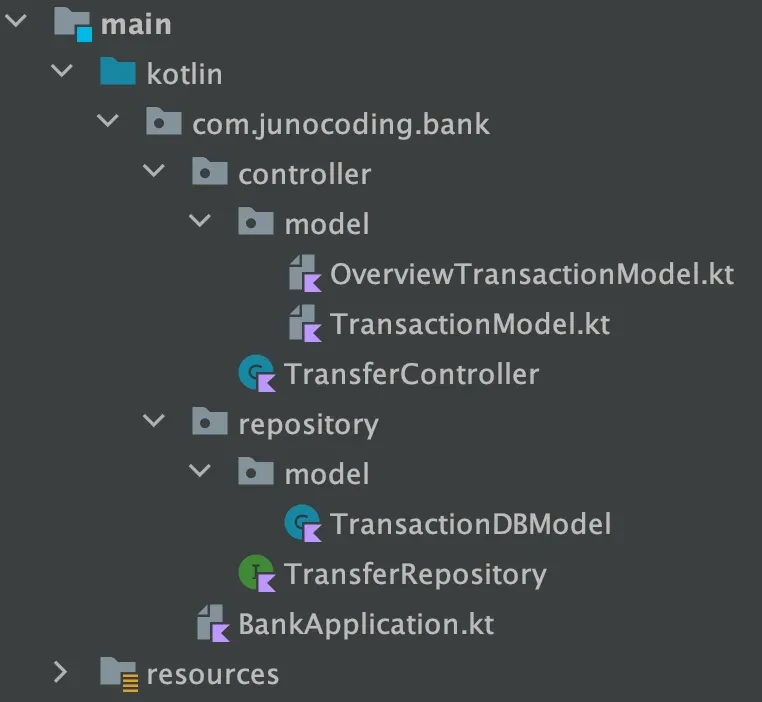
Create a new package at the same level as controller called repository. Inside this package, an interface called TransferRepository. Let’s also create another model package inside repository and on it a class called TransactionDBModel. In the end, you should have something like this:
First, let’s work on the DB model attributes. Similar to TransactionModel we’ll have the account identifier, value, and description. In order to save into the database, we need to have a unique identifier and this identifier will be generated automatically for us. We also gonna use the current date as the transaction’s date.
package com.backendhorizon.bank.repository.model

import java.util.*
import javax.persistence.Entity
import javax.persistence.GeneratedValue
import javax.persistence.Id

@Entity
class TransactionDBModel(
    val accountIdentifier: String,
    val value: Double,
    val description: String = "",
) {
    @Id
    @GeneratedValue
    var id: UUID? = null
        private set

    val date: Date = Date()
}
By constructor, we gonna receive the attributes that we receive via our API and in the class body, we’ll have the extra two attributes (id and date). We could already initialize the id with a random UUID but we’ll let JPA do that. We make the set private so we cannot override this value, just read it. The date will always be the current date, so we just initialize with the current one.
In this class we have three new annotations:
@Entity: This indicates that this class will be used by JPA (Java Persistence API) to save the data into a database.@Id: Indicates that the field annotated will be the primary key in the database for this entity.@GeneratedValue: the name is self-explanatory. It indicates that this primary key should auto-generate its own value.
Now that we have our model, we’ll create our interface that will do CRUD operations (Create, Read, Update and Delete). The way that we gonna do this is extending our TransferRepository with CrudRepository. It’s amazing how simple this is and powerful.
package com.backendhorizon.bank.repository

import com.backendhorizon.bank.repository.model.TransactionDBModel
import org.springframework.data.repository.CrudRepository
import java.util.*

interface TransferRepository: CrudRepository<TransactionDBModel, UUID>
If you open the CrudRepository interface it’s easy to see what’s happening. This interface has all the generic functionalities for CRUD and all we need is to indicate what type is our model and the primary key, in our case TransactionDBModel and UUID.
Just indicating the model and primary key types, Spring will find out that we’re using this interface and will inject a default implementation for this interface (and the types that we provide). You can take a look at the default implementation, it’s a class called SimpleJpaRepository.
Of course, we’re not limited to just these functions. It’s also possible to create more complex database operations, but for this article, we’ll work only with this default implementation.
From API to Database and vice-versa
Now that our persistence layer is done we can save the data that we’re receiving from the API. The only thing we need to do is a small conversion between our models since the model that we receive in the endpoint is different from the one that we use in the database. Let’s create two extension functions to convert these models, convertToDBModel and convertToOverviewTransactionModel.
First at TransactionModel, convert the endpoint model into a database one, TransactionDBModel.
package com.backendhorizon.bank.controller.model

import com.backendhorizon.bank.repository.model.TransactionDBModel

class TransactionModel(
    val targetAccount: String,
    val value: Double,
    val description: String = "",
)

fun TransactionModel.convertToDBModel() = TransactionDBModel(
    accountIdentifier = this.targetAccount,
    value = this.value,
    description = this.description
)
And for the overview, something similar. But this time the database model TransactionDBModel into an endpoint one, OverviewTransactionModel.
package com.backendhorizon.bank.controller.model

import com.backendhorizon.bank.repository.model.TransactionDBModel
import java.util.*

class OverviewTransactionModel(
    val targetAccount: String,
    val value: Double,
    val description: String,
    val date: Date,
    val id: String
)

fun TransactionDBModel.convertToOverviewTransactionModel() = OverviewTransactionModel(
    targetAccount = this.accountIdentifier,
    value = this.value,
    description = this.description,
    date = this.date,
    id = this.id.toString()
)
OK, now we can convert the data between our endpoints and the database. Let’s update our controller to do these calls.
Into the constructor, we’ll include our TransferRepository class. Remember, Spring is smart, when Spring sees that we have this dependency in our controller, Spring will inject the implementation created for TransactionRepository (based on SimpleJpaRepository).
package com.backendhorizon.bank.controller

import com.backendhorizon.bank.controller.model.TransactionModel
import com.backendhorizon.bank.controller.model.OverviewTransactionModel
import com.backendhorizon.bank.controller.model.convertToDBModel
import com.backendhorizon.bank.controller.model.convertToOverviewTransactionModel
import com.backendhorizon.bank.repository.TransferRepository
import org.springframework.web.bind.annotation.*

@RestController
@RequestMapping("/transfer")
class TransferController(val repository: TransferRepository) {

    @PostMapping("/new")
    fun newTransfer(@RequestBody transactionModel: TransactionModel) {
        repository.save(transactionModel.convertToDBModel())
    }

    @GetMapping("/all")
    fun getAllTransfers(): List<OverviewTransactionModel> {
        return repository.findAll().map { it.convertToOverviewTransactionModel() }
    }

}
You can see in the example above that our repository class is using the generic methods of CrudRepository to save and find all the transactions in the database. We also make use of the extension methods that we created to convert the model to the most appropriate one.
At this point, our endpoints are all done. Recompile and run the application. Let’s create a new transfer request. Remember that now we need to include all the necessary data on Postman to our endpoint to be able to work correctly. Include a JSON body like the picture below and submit.
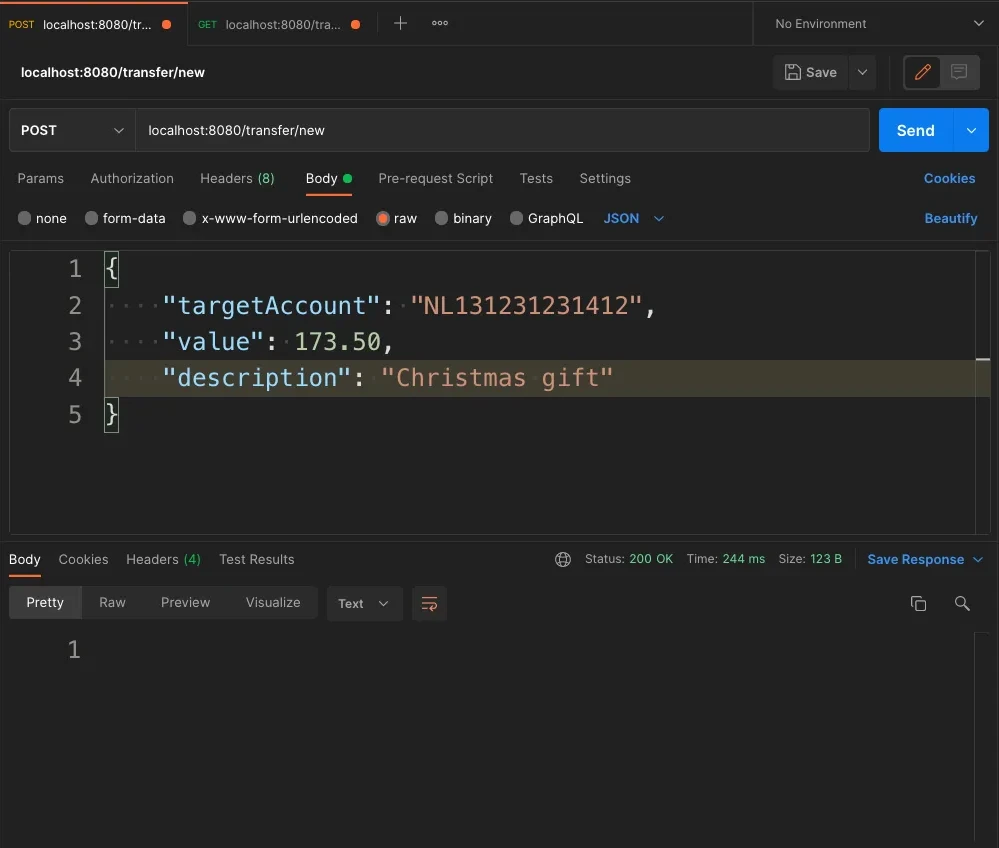
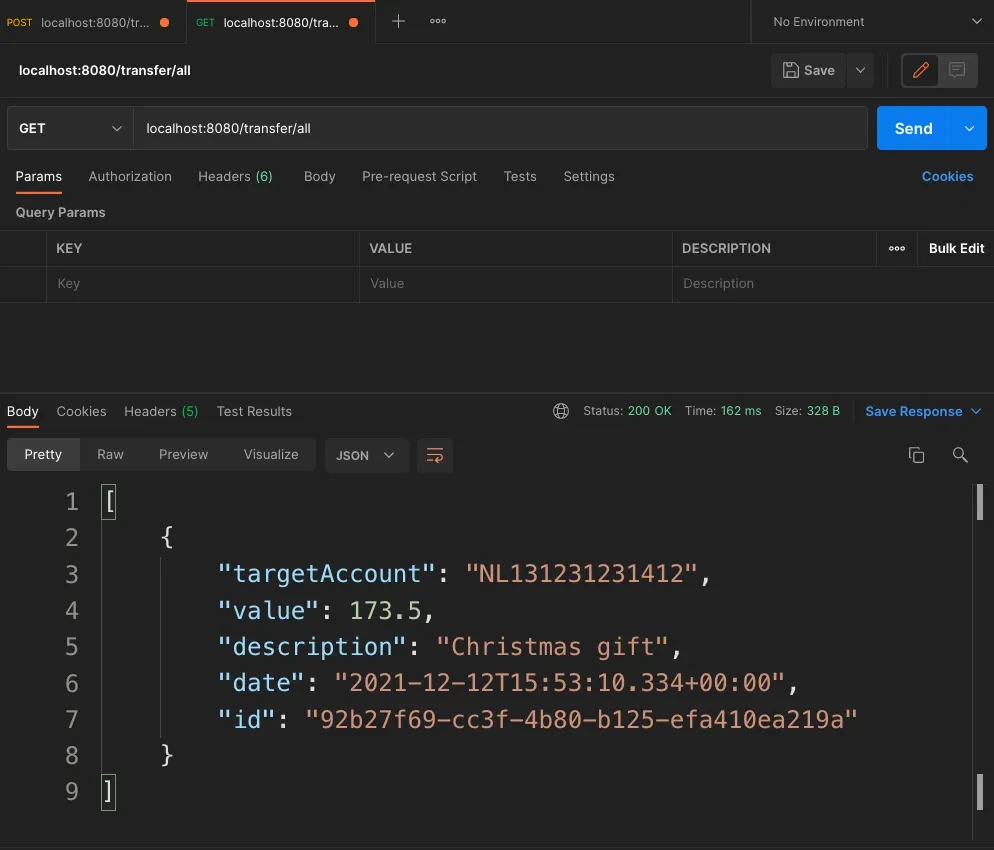
After submit, everything should work fine. You should receive a status 200, meaning that the request was a success. Now if you fetch all the data again, you’ll see the submitted transfer data, including the date and generated id.
Our API is working 🎉 but we’re not done yet!
Database Console
There’s a very nice way that H2 Database offers us to check the saved data and that’s the “H2 Console”. It’s a web admin where you can check the database data and run queries.
First, to enable this console you need to add the following code in your application.properties file inside the resource folder.
# Enabling H2 Console
spring.h2.console.enabled=true
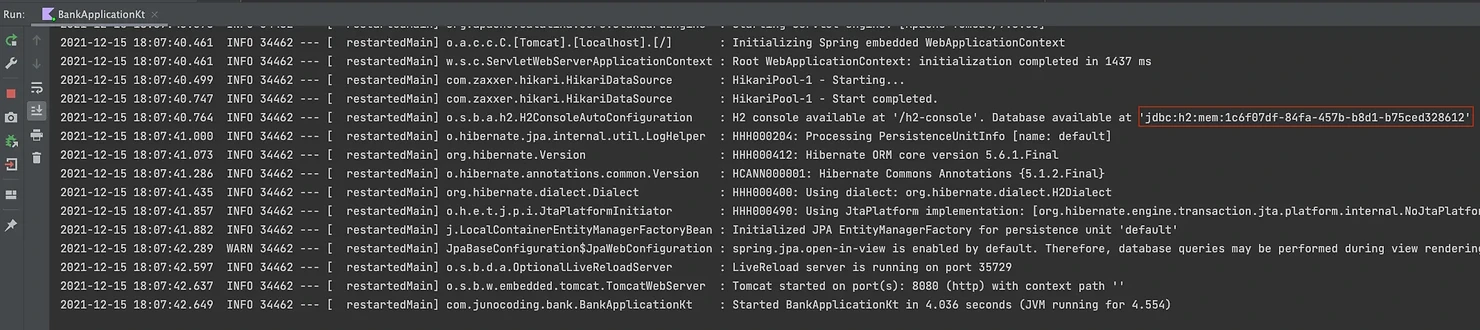
After added, run your application again and enter in your browser the URL http://localhost:8080/h2-console. You gonna see a login window to connect to your database. The only thing you need to change is the JDBC Url . Look into your console logs and search for “H2 console available at …” like in the picture below.
Copy the database URL and press connect. You should see the console. Now you can play with your database, run SQL queries and see the data being saved from your API.
Now we’re done, right? WRONG! We’re good developers and good developers write tests!
Unit tests
Before writing our first test let’s add a new dependency in the dependencies block inside the build.gradle.kts. With this dependency instead of Mockito, we gonna use Mockk to create mock instances.
// ... other dependencies already included
testImplementation("com.ninja-squad:springmockk:3.0.1")
This library helps us to support Mockk better in the Spring context. You can read more about it here.
Create a new class called PaymentsControllerTest inside the tests folder. Take a moment to take a look at the tests below and we’ll understand what’s happening.
package com.backendhorizon.bank.controller

import com.fasterxml.jackson.databind.ObjectMapper
import com.backendhorizon.bank.controller.model.TransactionModel
import com.backendhorizon.bank.repository.TransferRepository
import com.backendhorizon.bank.repository.model.TransactionDBModel
import com.ninjasquad.springmockk.MockkBean
import io.mockk.every
import io.mockk.mockk
import org.junit.jupiter.api.Test
import org.springframework.beans.factory.annotation.Autowired
import org.springframework.boot.test.autoconfigure.web.servlet.WebMvcTest
import org.springframework.http.MediaType
import org.springframework.test.web.servlet.MockMvc
import org.springframework.test.web.servlet.request.MockMvcRequestBuilders.get
import org.springframework.test.web.servlet.request.MockMvcRequestBuilders.post
import org.springframework.test.web.servlet.result.MockMvcResultHandlers.print
import org.springframework.test.web.servlet.result.MockMvcResultMatchers.*
import java.util.*


@WebMvcTest
class PaymentsControllerTest(@Autowired val mockMvc: MockMvc) {

    @MockkBean
    private lateinit var paymentsRepository: TransferRepository


    @Test
    fun `should submit transaction with success`() {
        val transfer = TransactionModel(
            value = 1.50,
            description = "store 1",
            targetAccount = "NL76ABNA2376059879"
        )

        every { paymentsRepository.save(any()) } returns mockk()

        mockMvc.perform(post("/transfer/new")
            .content(ObjectMapper().writeValueAsString(transfer))
            .contentType(MediaType.APPLICATION_JSON)
            .accept(MediaType.APPLICATION_JSON))
            .andDo(print())
            .andExpect(status().isOk)
    }

    @Test
    fun `should get transaction with success`() {
        val mockTransaction = mockk<TransactionDBModel>().apply {
            every { value } returns 1.50
            every { description } returns "store 1"
            every { accountIdentifier } returns "NL47INGB8845464385"
            every { date } returns Date()
            every { id } returns UUID.randomUUID()
        }

        every { paymentsRepository.findAll() } returns listOf(mockTransaction)

        mockMvc.perform(get("/transfer/all").accept(MediaType.APPLICATION_JSON))
            .andDo(print())
            .andExpect(status().isOk)
            .andExpect(content().contentType(MediaType.APPLICATION_JSON))
            .andExpect(jsonPath("\$.[0].description").value("store 1"))
    }

    @Test
    fun `should return a bad request error if the request there's no body`() {
        mockMvc.perform(post("/transfer/new")
            .contentType(MediaType.APPLICATION_JSON)
            .accept(MediaType.APPLICATION_JSON))
            .andDo(print())
            .andExpect(status().is4xxClientError)
    }

}
The general idea of what the tests are doing it’s easy to understand thanks to the Spring Testing framework, that’s very expressive. Let’s take a look at the technicalities:
@WebMvcTest: This annotation indicates that these tests are testing an MVC Component, in this case, a REST controller.MockMVC: This is the entry point that will allow us to communicate with our controller during the tests, doing requests and checking the result and statuses.@MockkBean: We’re mocking a fakeTransferRepositoryclass to simulate different scenarios. We simulate these scenarios always before we perform an action withMockMvc, mocking the result fromfindAllandsavemethods.
After we set up our mocks we perform a request to the controller using MockMvc. All tests follow a similar structure:
- We tell to
MockMvcto perform a request and what kind it’s (post or get). - If we have a body in the request we transform the object into a JSON.
- The content type of the request,
APPLICATION_JSON. - We print in the console the request details and results.
- And finally, we declare what we expect from this request. It can be a status code checking if the request succeeds or a JSON response (and the content).
And we’re finally done. 🎉🎉🎉
You can find the full project on GitHub.
Questions or suggestions, please leave a comment, we’re all here to learn together. 🤠
Thanks for reading.